progit 笔记 03 - 分支功能
本部分主要介绍 Git 的分支功能。
分支简介
Git 的分支,本质上仅仅是指向提交对象的可变指针。Git 的默认分支名字是 master,它会在每次提交操作中自动向前移动。
分支创建
使用下面命令,创建 testing 分支:
1
$ git branch testing
这会在当前所在的提交对象上创建一个指针,新建的分支和原来的分支同时指向相同提交历史。Git 还存在一个名为 HEAD 的特殊指针,指向当前所在的本地分支。
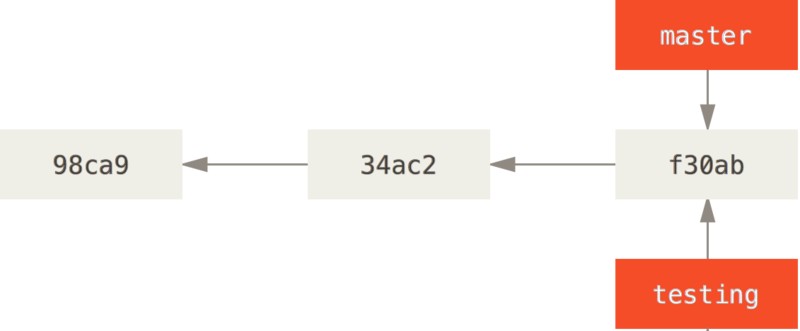
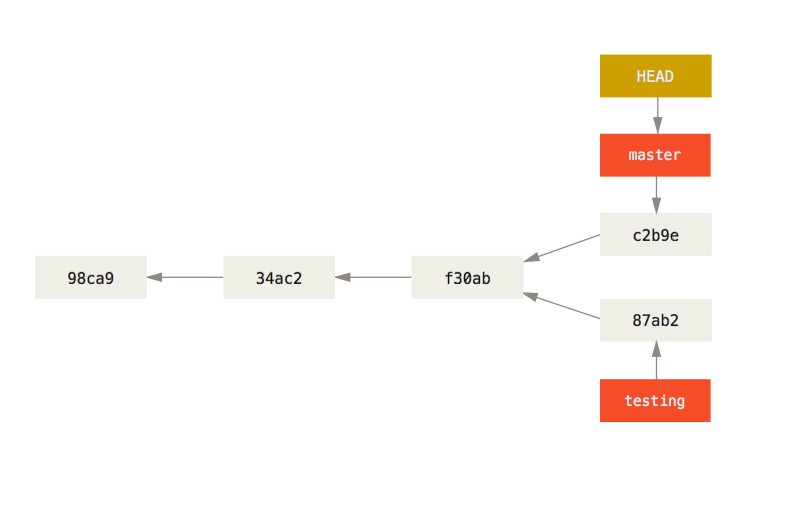
使用git log --decorate查看各个分支当前所指的对象:
1
2
3
4
5
6
$ git log --oneline --decorate
f30ab (HEAD, master, testing) add feature #32 - ability to add new

34ac2 fixed bug #1328 - stack overflow under certain conditions

98ca9 initial commit of my project
分支切换
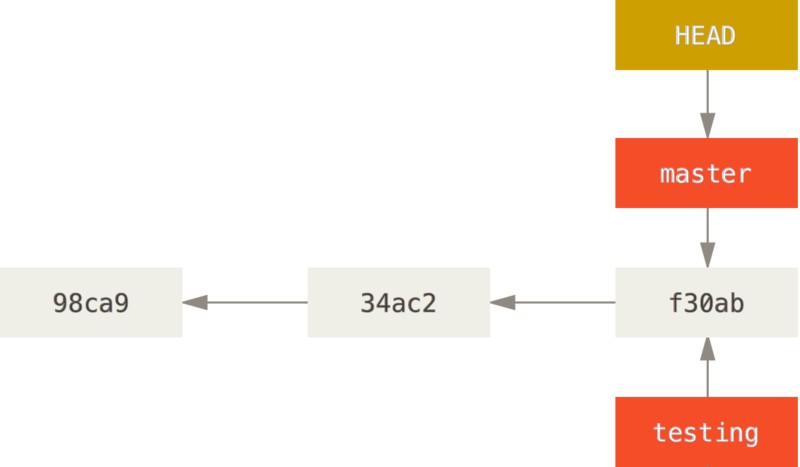
使用git checkout命令切换分支:
1
$ git checkout testing
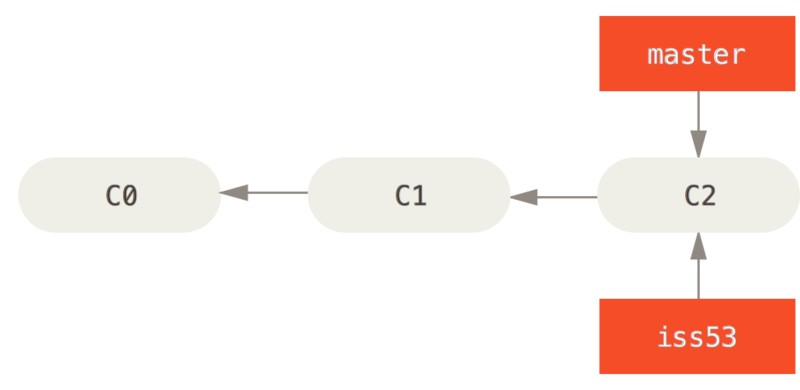
这时 HEAD就指向 testing 分支了。
再次修改并提交:
1
2
$ vim test.rb
$ git commit -a -m 'made a change'
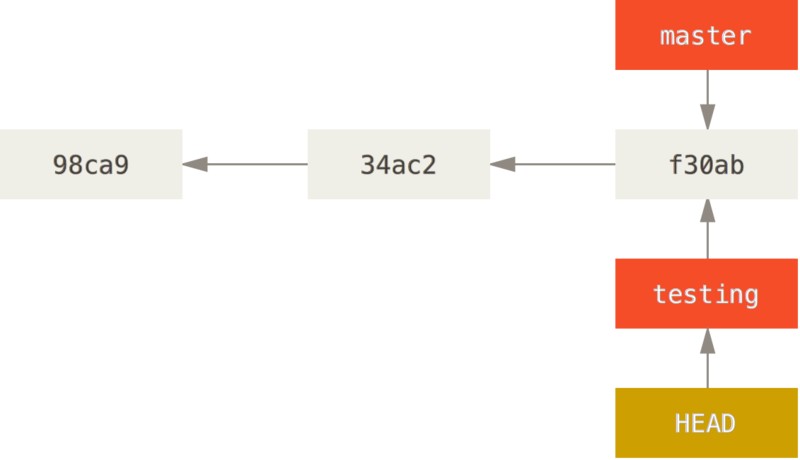
此时的提交历史如下:
此时切回 master 分支:
1
$ git checkout master

此时 git checkout 命令做了两件事:
- 使 HEAD 指回
master分支 - 将工作目录恢复为
master分支所指向的快照内容。
分支切换会改变工作目录中的文件
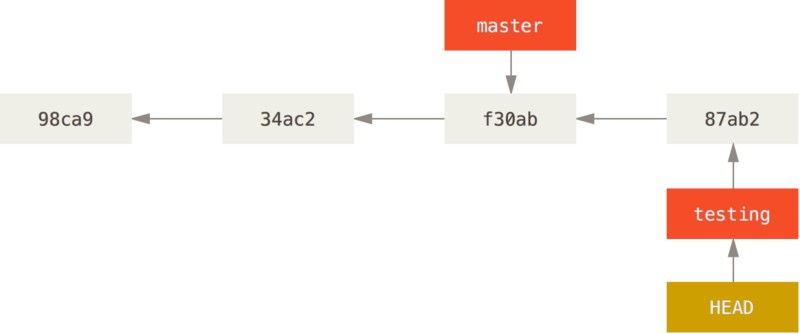
此时再对项目文件进行修改并提交:
1
2
$ vim test.rb
$ git commit -a -m 'made other changes'
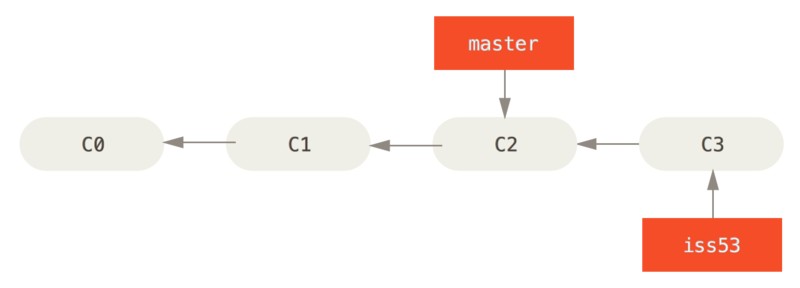
此时项目提交历史已经分叉。新的提交历史看起来如下:
使用 git log 命令查看分叉历史:
1
2
3
4
5
6
7
8
9
10
11
12
$ git log --oneline --decorate --graph --all
* c2b9e (HEAD, master) made other changes

| * 87ab2 (testing) made a change

|/

* f30ab add feature #32 - ability to add new formats to the

* 34ac2 fixed bug #1328 - stack overflow under certain conditions

* 98ca9 initial commit of my project
分支的新建与合并
这里通过一个实际的例子,展示分支的新建与合并。
- 开发某个网站
- 为实现某个新需求,创建一个分支
- 在这个分支上开展工作
此时突然线上突然有一个严重的问题需要紧急修复:
- 切换到线上分支
- 为这个紧急任务创建一个分支,并修复问题
- 测试通过后,切换回线上分支,合并修补分支,将改动推送到线上分支
- 切换回最初的工作分支,继续工作
新建分支
假设现在的项目存在一些提交:

现在需要解决紧急问题#53,可以使用带 -b 参数的 git checokout 命令,新建分支同时切换到新分支:
1
2
$ git checkout -b iss53
Switched to a new branch "iss53"
该命令是下面两条命令的简写:
1
2
$ git branch iss53
$ git checkout iss53
此时你针对 #53 问题进行了一些修改并提交,iss53 分支在不断推进:
1
2
$ vim index.html
$ git commit -a -m 'added a new footer[issue 53]'
此时一个新的问题出现需要解决,需要我们新建一个针对该问题的分支(hotfix branch),并且解决问题:
1
2
3
4
5
6
7
8
$ git checkout -b hotfix
Switched to a new branch 'hotfix'

$ vim index.html
$ git commit -a -m 'fixed the broken email address'
[hotfix 1fb7853] fixed the broken email address

1 file changed, 2 insertions(+)
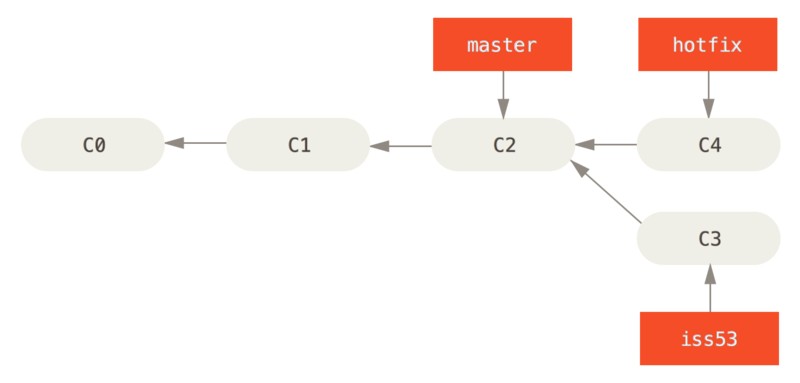
当测试完成后,需要将 hotfix 分支合并到 master 分支,来部署到线上。使用 git merge 命令来达到该目的:
1
2
3
4
5
6
7
8
9
$ git checkout master
$ git merge hotfix
Updating f42c576..3a0874c

Fast-forward

index.html | 2 ++

1 file changed, 2 insertions(+)
本次合并中有一个 ‘Fast-forword’ 关键词,意味着当前 master 分支所指的提交是现在提交 hotfix 分支的直接上游,此时 Git 只是简单的将指针向前移动。
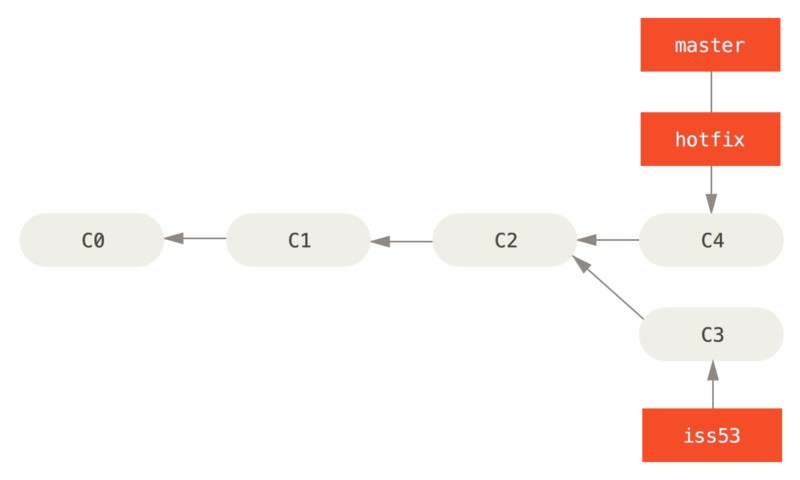
这个紧急问题的解决方案发布之后,可以通过带 -d 选项的 git branch 命令来删除分支:
1
2
$ git branch -d hotfix
Deleted branch hotfix (3a0874c).
现在可以切换回原来工作的分支(针对#53 问题的分支):
1
2
3
4
5
6
7
8
$ git checkout iss53
Switched to branch "iss53"

$ vim index.html
$ git commit -a -m 'finished the new footer [issue 53]'
[iss53 ad82d7a] finished the new footer [issue 53]

1 file changed, 1 insertion(+)

分支的合并
运行下面命令,将 iss53 分支合并到 master 分支中:
1
2
3
4
5
$ git checkout master
$ git merge iss53
Merge made by the 'recursive' strategy.
index.html | 1 +
1 file changed, 1 insertion(+)

合并成功后可以删除 iss53 分支:
1
$ git branch -d iss53
遇到冲突时的分支合并
如果在合并时产生合并冲突:
1
2
3
4
5
6
7
$ git merge iss53

Auto-merging index.html

CONFLICT (content): Merge conflict in index.html

Automatic merge failed; fix conflicts and then commit the result.
检查 git status 时会显示如下:
1
2
3
4
5
6
7
8
9
10
11
12
13
14
15
16
17
18
19
20
21
$ git status

On branch master

You have unmerged paths.

  (fix conflicts and run "git commit")


Unmerged paths:

  (use "git add <file>..." to mark resolution)


    both modified: index.html


no changes added to commit (use "git add" and/or "git commit -a")
出现冲突的文件会包含一些特殊区段,类似:
1
2
3
4
5
6
7
8
9
10
11
12
13
<<<<<<< HEAD:index.html

<div id="footer">contact : email.support@github.com</div>

=======

<div id="footer">

please contact us at support@github.com

</div>

>>>>>>> iss53:index.html
这表示 HEAD 所指示的版本在这个区域的上半部分(====的上半部分),而 iss53 分支所指示的版本在====的下班部分。你必须选择其中那个一个,或者你也可以自行合并这些内容,比如将该部分替换为下面内容来解决冲突:
1
2
3
4
5
<div id="footer">

please contact us at email.support@github.com

</div>
也可以使用图形化的工具来解决冲突,比如运行 git mergetool 启动一个合适的图形化工具:
1
$ git mergetool
等待退出图形化工具之后,Git 会讯问是否合并成功。如果回答是,Git 会暂存文件表明冲突已解决。可以运行 git status 来确认所有的合并冲突都已被解决:
1
2
3
4
5
6
7
8
9
10
11
12
13
14
15
$ git status

On branch master

All conflicts fixed but you are still merging.

  (use "git commit" to conclude merge)


Changes to be committed:


    modified: index.html
如果结果正确,并且之前有冲突的文件都已暂存,就可以使用 git commit 来提交合并了。
分支管理
运行 git branch 获得当前所有分支的列表:
1
2
3
4
$ git branch
  iss53
* master
  testing
注意 master 分支前的 * 字符,它代表现在检出的那个分支(也就是当前 HEAD 指针所指向的分支)。
运行 git branch -v 查看每个分支的最后一次提交:
1
2
3
4
5
6
7
$ git branch -v

  iss53 93b412c fix javascript issue

* master 7a98805 Merge branch 'iss53'

  testing 782fd34 add scott to the author list in the readmes
使用带有 --merged 和 --no-merged 选项来过滤已经合并或尚未合并的分支:
1
2
3
4
5
$ git branch --merged

  iss53

* master
使用 git branch -d 删除未合并的分支会提示失败:
1
2
3
4
5
$ git branch -d testing

error: The branch 'testing' is not fully merged.

If you are sure you want to delete it, run 'git branch -D testing'.
如果确实需要删除分支,可以使用 -D 选项强制删除。
远程分支
远程引用是对远程仓库的引用(指针),包括分支、标签等等。可以通过 git ls-remote 来显式的获取远程引用的完整版本,或者通过 git remote show 获得远程分支的更多信息。
远程分支以 (remote)/(branch) 形式命名。例如查看最后一次与远程仓库 origin 通信时 master 分支的状态,可以查看 origin/master 分支。
如果有一个 git.ourcompany.com 的 Git 服务器,从这里克隆一个项目,Git 的 clone 命令会将其自动名 origin,拉取它的所有数据,创建一个指向它的 master 分支的指针,并且在本地将其命名为 origin/master。Git 也会创建一个与 origin 的 master 分支指向同一个地方的本地 master 分支,这样就可以在此基础上工作了。
如果此时你在本地 master 分支做了一定修改,同一时间其他人推送提交到远程 master 分支,那么只要你不和 origin 服务器连接,本地的 origin/master 指针就不会移动。
如果需要同步,运行 git fetch origin 命令。这个命令从 origin 服务器抓取本地没有的数据,并且更新本地数据库,移动 origin/master 指针指向新的、更新后的位置。
推送
当需要将本地分支推送到远程仓库时,必须显式的推送想要分享的分支。
如果希望推送 serverfix 分支,运行命令:
1
2
3
4
5
6
7
8
9
10
11
12
13
14
15
$ git push origin serverfix

Counting objects: 24, done.

Delta compression using up to 8 threads.

Compressing objects: 100% (15/15), done.

Writing objects: 100% (24/24), 1.91 KiB | 0 bytes/s, done.

Total 24 (delta 2), reused 0 (delta 0)

To https://github.com/schacon/simplegit

* [new branch] serverfix -> serverfix
Git 自动将 serverfix 分支名字展开为 refs/heads/serverfix:refs/heads/serverfix,上面命令就意味着:推送本地的 serverfix 分支来更新远程的 serverfix 分支。如果需要为远程仓库上的分支使用不同的名称,可以运行 git push origin serverfix:awesomebranch 来将本地的 serverfix 分支推送到远程仓库上的 awesomebranch 分支。
下一次其他协作者从服务器上抓取数据时,会在本地生成一个远程分支 origin/serverfix,指向服务器的 serverfix 分支的引用:
1
2
3
4
5
6
7
8
9
10
11
12
13
$ git fetch origin

remote: Counting objects: 7, done.

remote: Compressing objects: 100% (2/2), done.

remote: Total 3 (delta 0), reused 3 (delta 0)

Unpacking objects: 100% (3/3), done.

From https://github.com/schacon/simplegit

* [new branch] serverfix -> origin/serverfix
当抓取到新的远程跟踪分支时,本地不会自动生成一份可编辑的副本。如果想要在自己的 serverfix 分支上工作,可以将其简历在远程跟踪分支上:
1
2
3
4
5
$ git checkout -b serverfix origin/serverfix

Branch serverfix set up to track remote branch serverfix from origin.

Switched to a new branch 'serverfix'
跟踪分支
从一个远程跟踪分支检出一个本地分支会自动创建一个叫做“跟踪分支”。跟踪分支是与远程分支有直接关系的本地分支。如果在一个跟踪分支上执行 git pull,Git 能自动识别去哪个服务器抓取数据、合并到哪个分支。
当使用 git clone 克隆一个仓库时,它通常会自动创建一个跟踪 origin/master 的 master 分支。可以手动设置其他跟踪分支/或者不跟踪。运行之前提过的命令 git checkout -b [branch] [remotename]/[branch] 来跟踪指定的分支,或者使用 --track 快捷方式:
1
2
3
4
5
$ git checkout --track origin/serverfix

Branch serverfix set up to track remote branch serverfix from origin.

Switched to a new branch 'serverfix'
如果需要将本地分支与远程分支设置不同的名字,可以运行:
1
2
3
4
5
$ git checkout -b sf origin/serverfix

Branch sf set up to track remote branch serverfix from origin.

Switched to a new branch 'sf'
此时,本地分支 sf 会自动从 origin/master 拉取。
设置已有的本地分支跟踪一个远程分支,或者修改正在跟踪的上游分支,可以使用 -u 或 --set-upstream-to 选项运行 git branch 来手动指定:
1
2
3
$ git branch -u origin/serverfix

Branch serverfix set up to track remote branch serverfix from origin.
使用 git branch -vv 来查看设置的所有跟踪分支,以及更多信息:
1
2
3
4
5
6
7
8
9
$ git branch -vv

  iss53 7e424c3 [origin/iss53: ahead 2] forgot the brackets

  master 1ae2a45 [origin/master] deploying index fix

* serverfix f8674d9 [teamone/server-fix-good: ahead 3, behind 1] this should do it

  testing 5ea463a trying something new
这里看到 iss53 分支正在跟踪 origin/iss53 并且 ahead 2 表示本地有两个提交没有推送到服务器;master 分支正在跟踪 origin/master 并且是最新的;serverfix 分支正在跟踪 teamone 服务器上的 server-fix-good 分支并且有 3 次修改未提交到服务器,服务器有 1 次提交没有拉取合并;testing 分支没有跟踪任何远程分支。
需要注意的是该命令是本地执行的,显示的是上一次连接服务器时的状态。如果需要最新数据,需要在运行此命令前抓取所有的远程仓库:
1
$ git fetch --all;git branch -vv
拉取
git fetch 命令只会抓取服务器上的数据,不会修改工作目录中的内容自动合并。另一个命令 git pull 大多数情况下的含义是 git fetch 后面紧接着一个 git merge 命令,如果本地分支已经设置好了跟踪分支(不管是手动设置的还是通过 git clone 自动设置的),git pull 都会查找当前分支跟踪的服务器分支,从服务器获取最新数据并合并到本地的那个远程分支中。
由于 git pull 自动合并经常让人困惑,所以推荐单独使用 fetch 和 merge 命令手动合并会更好一些。
删除远程分支
通过带有 --delete 选项的 git push 命令来删除远程分支:
1
2
3
4
5
$ git push origin --delete serverfix

To https://github.com/schacon/simplegit

- [deleted] serverfix
变基
在 Git 中整合来自不同分支的修改主要有两种方法:merge 和 rebase。
变基的基本操作
整合分支最容易的方法是 merge 命令。它会将两个分支最新快照以及两者最近的共同祖先进行三方合并,生成一个新的快照(并提交)。
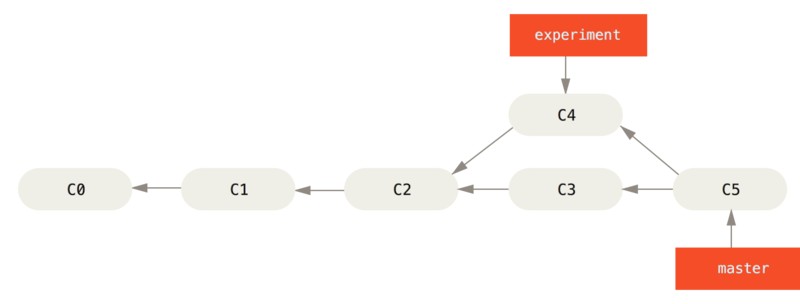
另一种方法:提取在 C4 分支中引入的补丁和修改,然后在 C3 的基础上再应用一次。这种操作叫 #变基#。使用 rebase 命令将提交到某一分支上的所有修改都移至另一分支上,就好像“重新播放”一样。
这个例子的操作:
1
2
3
4
5
6
$ git checkout experiment
$ git rebase master

First, rewinding head to replay your work on top of it...

Applying: added staged command
原理是:首先找到这两个分支(当前分支 experiment、变基操作的目标基底分支 master)的最近共同祖先 C2,然后对比当前分支相对于该祖先的历次提交,提取相应的修改并存为临时文件,然后将当前分支指向目标基底 C3,最后以此将之前另存为临时文件的修改依序应用。
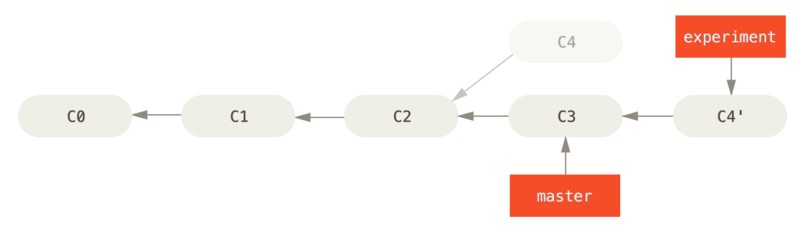
现在回到 master 分支,进行依次快进合并:
1
2
$ git checkout master
$ git merge experiment
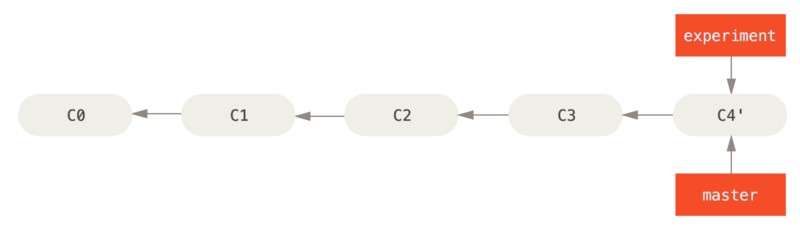
此时 C4’ 指向的快照就跟上面使用 merge 命令的例子中 C5 指向的快照一模一样了。这两种整合方法最终结果没有任何区别,但是变基会使得提交历史更加整洁。
更有趣的变基例子
在对两个分支进行变基时,所生成的“重演”并不一定需要在目标分支上应用,也可以指定另外的一个分支进行应用。
下面例子是这样:在 master 分支上创建了一个特性分支 server,提交了 C3 和 C4。然后在 C3 上创建了特性分支 client,提交了 C8 和 C9。最后在 server 分支提交了 C10。
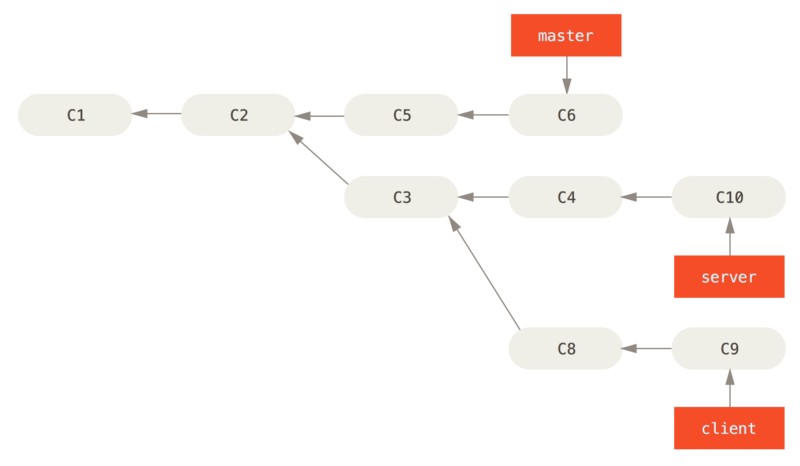
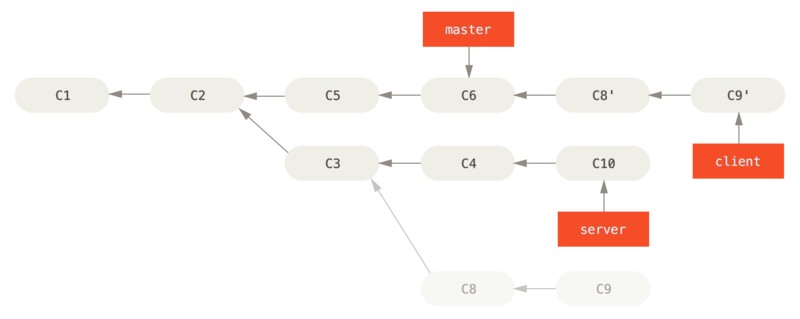
假设需要将 client 中的修改合并到 master 分支,但不需要合并 server 中的修改。可以使用 git rebase 命令的 --onto 选项,选中在 client 分支里但不在 server 分支里的修改(C8/C9),将它们在 master 分支上重演:
1
$ git rebase --onto master server client
该命令的含义:取出 client 分支,找出处于 client 分支和 server 分支的共同祖先之后的修改,然后在 master 分支上重演一遍。
执行后的效果如图:
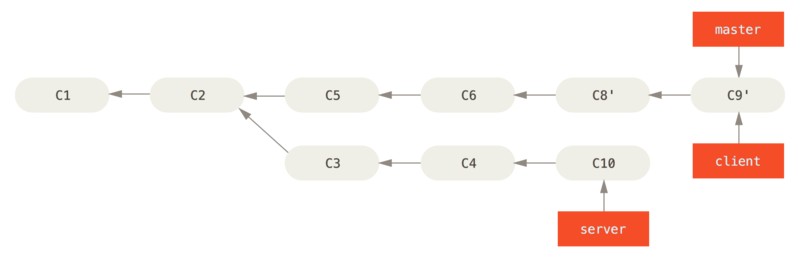
现在可以进行快速合并了:
1
2
$ git checkout master
$ git merge client
然后将 server 分支也整合进来:
1
$ git rebase master server

如图,server 的代码被“续”到了 master 后面
然后再进行快进合并主分支 master:
1
2
$ git checkout master
$ git merge server
现在 client 和 server 分支中的修改都已经整合到了主分支,可以删除这两个分支:
1
2
$ git branch -d client
$ git branch -d server
最后的提交历史如图:

变基的风险
不要对在你的仓库外有副本的分支执行变基,会使提交记录变得混乱。
用变基解决变基
如果真的发生了变基之后被重复提交的情况你,再次使用变基命令来整理。
简单的方法是使用 git pull --rebase 而不是直接使用 git pull。或者可以手动 git fetch 再执行 git rebase remote/master
变基 vs. 合并
一种观点认为仓库的提交历史是 记录实际发生过什么 ;另一种是 项目过程中发生的故事 。
总的原则是,只对尚未推送或分享给他人的本地修改执行变基操作,清理历史,从不对已推送的提交执行变基操作。